我个人下馆子并不喜欢被菜单约束住,因为总是看上去什么都想吃,但限于没有同伴总是单人用餐而无法多点几道菜。因此,我比较喜欢允许餐点自选的自助餐厅。这里我就简单评价一下截至2024年1月我在美国宾州匹兹堡地区去过的,提供自助餐(buffet)或吃到饱(all you can eat)服务的几家餐厅。列出的餐厅都是适合单人前往的,像 Hunan Bar 那种三人以上的火锅自助不在本文讨论范围内。
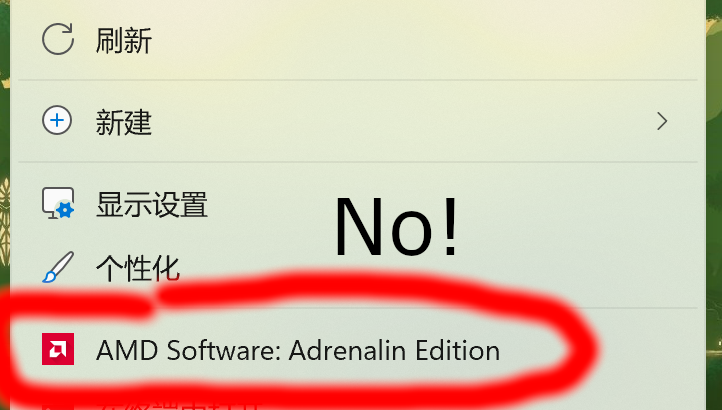
I just bought a Lenovo 14p Gen 3 laptop with preinstalled Windows 11. Since it is an AMD-based laptop, it has an AMD configuration software installed, namely AMD Software: Adrenalin Edition. It provides several useful features for screen display. However, the annoying thing is that it adds an extra entry in Windows 11’s default Context Menu. Luckily, there is a way to block such entry without uninstalling the AMD software.
Desktop right click menu, showing the annoying “AMD software: Adrenalin Edition” entry.
Steps to hide entry using Regedit
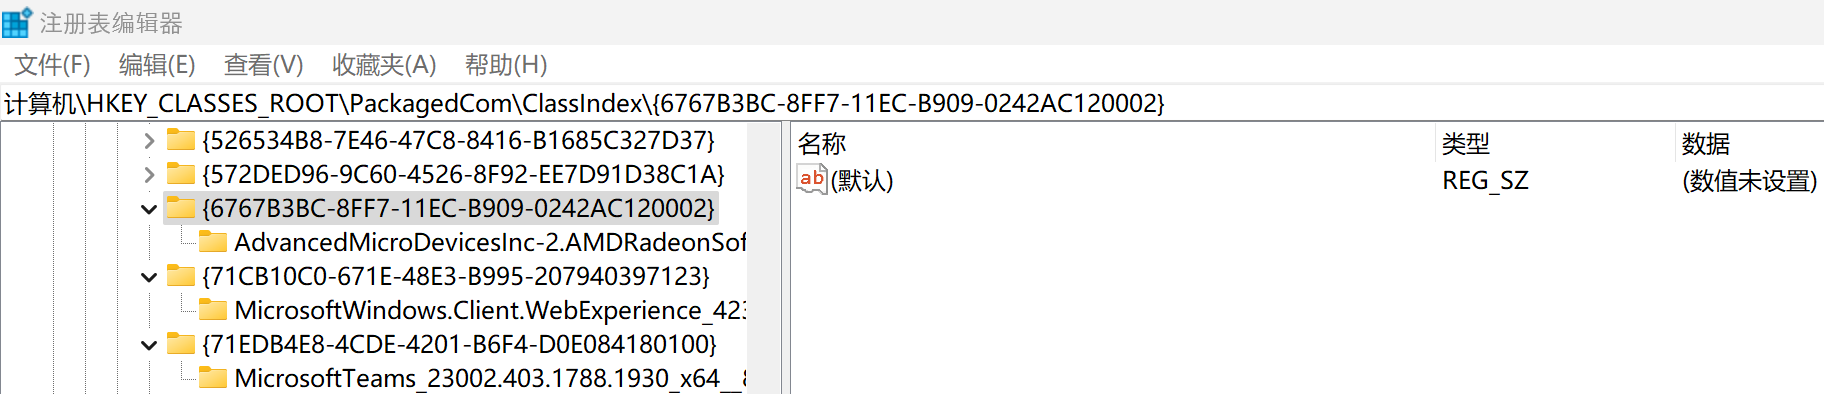
Open regedit.exe and visit \HKEY_CLASSES_ROOT\PackagedCom\ClassIndex\. There should be several tens of entries (keys) under that, all named after {UUID}.
Expand all entries you saw in Step 1 and look for the entry containing keyword AdvancedMicroDevicesInc (“AMD”). Once you find it, copy its corresponding UUID string. We will use it in the steps below. In this case, the UUID starting with 6767... is what we need.
Open regedit.exe and visit \HKEY_LOCAL_MACHINE\SOFTWARE\Microsoft\Windows\CurrentVersion\Shell Extensions\. There should be three keys under Shell Extensions: Approved, Blocked, and Cached. If there is no Blocked key on your system, manually create it by right-clicking Shell Extensions, and create a new key named Blocked.
Enter Blocked key (which appears as a directory in regedit tool). Under directory Blocked, create a new String (aka type REG_SZ). Rename the String as {UUID}, in which UUID is the same UUID as we found in Step 2. Example of final result under Shell Extensions\Blocked key
Go back to desktop and try with right click. If everything is done correctly, the AMD Software entry will immediately disappear in the right-click menu.
If you want to revert our modification, simply delete the value we created in Step 4.
Remove amd software from right click context menu. This is essentially the same approach as in my texts, except that the UUID in this article has changed and in lack of explanation about how to determine the correct “Blocked” UUID.
TL;DR: Pbuilder-related tools are ineffective and redundant. By installing sbuild and schroot, one can set up clean and reusable chroot environments quickly and use the sole sbuild command to build Debian source packages (using src tree or .dsc files).
Fade away please pbuilder/cowbuilder; long live sbuild!
Quick example
Install tools and preparation
sudo apt update;
sudo apt install sbuild schroot;
sudo mkdir -p /var/lib/sbuild/chroots; # the last component is made by us
sudo chown sbuild:sbuild /var/lib/sbuild/chroots;
Initialize a chroot environment using sbuild-createchroot
# Assume host machine is of x86_64 architecture, create an unstable chroot
sudo sbuild-createchroot unstable /var/lib/sbuild/chroots/unstable-amd64 \
  --alias=sid --alias=UNRELEASED http://deb.debian.org/debian;
Keep (s)chroot environment updated
sudo sbuild-update -ud unstable;
Build a Debian package using sbuild with previously created chroot environment
# If you want to drop superuser privilege, add yourself into sbuild group first.
# Other settings might be needed. See sbuild-adduser(1).
# #################################
# Option 1: have proper Debian source package
sbuild -A -v -d unstable /path/to/package.dsc
#
# Option 2: chdir into extracted source tree with .orig tarball in parent directory
sbuild -A -v -d unstable
# Option 3: integrate with git-buildpackage (gbp)
gbp buildpackage --git-builder=sbuild -A -v -d unstable
#
# Notes:
# 1. If you need source-only changes (https://wiki.debian.org/SourceOnlyUpload),
#    append "--source" to sbuild's invocation
# 2. If you want to sign your build, append "-kxxxxxxxx"
#    to your sbuild's invocation, where xxxxxxxx is you gpg keyid
How to destroy schroot environment properly
If you do not wish to use schroot and sbuild anymore, you may use the following tool to properly destroy the schroot environment:
# Destroy the chroot instance named "unstable"
sudo sbuild-destroychroot unstable
# This script actually does nothing other than providing instructions.
# You will need to follow the printed instruction and safely
# destroy the schroot instance by yourself.
Let’s assume that you find the source code of a software for Debian with a debian/ directory included. How to prepare the .dsc package (Debian source package) used for upload quickly? I will show you here.
Extract the software into a certain directory, let’s say foobar/.
Repack original tarball and exclude debian/ dir using tar. Rename orig tarball as <PKGNAME>_<PKGVER>.orig.tar.{bz2,gz,lzma,xz}. Note that if your package is Debian native, you should skip this step.